How to Use CoSec Lists to Strengthen IT Security
Learn how to use CoSec’s blocked_domains and banned_ips lists to strengthen the protection of your IT infrastructure.

github repo: https://github.com/skillmio/CoSec
What is a Blocklist?
A blocklist is a collection of domains or IP addresses identified as malicious, suspicious, or unwanted. These lists are used to prevent communication with known threats, reducing the risk of malware, phishing, botnets, and abusive advertising.
What are blocked_domains.txt and banned_ips.txt?
- blocked_domains.txt – A list of malicious or unwanted domains that should be blocked at the DNS level.
- banned_ips.txt – A list of IP addresses associated with suspicious or malicious activity, recommended for blocking at the firewall or filtering system level.
These lists are maintained as part of the CoSec initiative, developed by Skillmio, with a focus on continuously strengthening digital security.
Blocked Domains
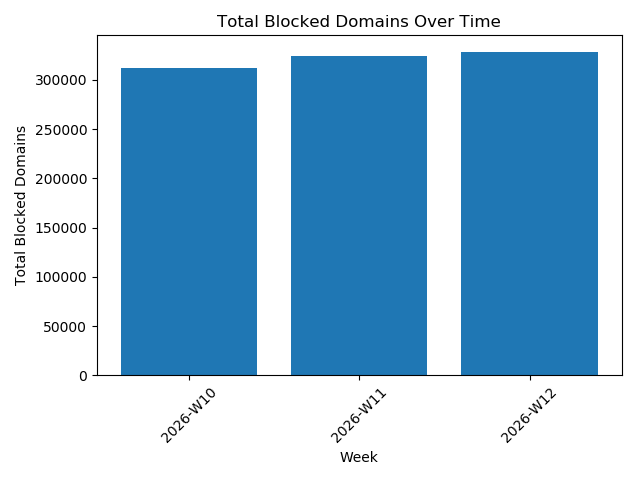 Blocked Domains Trend Over Time Graph
How to Use blocked_domains.txt?
Method 1 – Upstream (Recommended)
The fastest and simplest way to use blocked_domains.txt is to configure Skillmio’s DNS servers as upstream forwarders in your internal DNS server.
This allows all DNS traffic within your organization to automatically benefit from filtering.
Skillmio DNS Servers:
102.213.34.98196.61.76.76
Configuration in Active Directory (Windows Server)
- Open DNS Manager
- Right-click the DNS server
- Select Properties
- Go to the Forwarders tab
Add:
102.213.34.98196.61.76.76
- Click OK
After configuration, all external queries will pass through Skillmio’s servers.
Configuration in BIND (Linux)
1. Edit configuration file
Debian / Ubuntu:
1
sudo vi /etc/bind/named.conf.options
CentOS / RHEL:
1
sudo vi /etc/named.conf
2. Add or adjust the options block:
1
2
3
4
5
6
7
8
9
10
options {
    directory "/var/cache/bind";

    forwarders {
        102.213.34.98;   // Skillmio DNS 1
        196.61.76.76;    // Skillmio DNS 2
    };

    recursion yes;
};
3. Validate configuration
1
sudo named-checkconf
4. Restart service
Debian / Ubuntu:
1
sudo systemctl restart bind9
CentOS / RHEL:
1
sudo systemctl restart named
After restarting the service, your DNS server will begin using filtering based on the blocked_domains.txt list through Skillmio servers.
Banned IPs
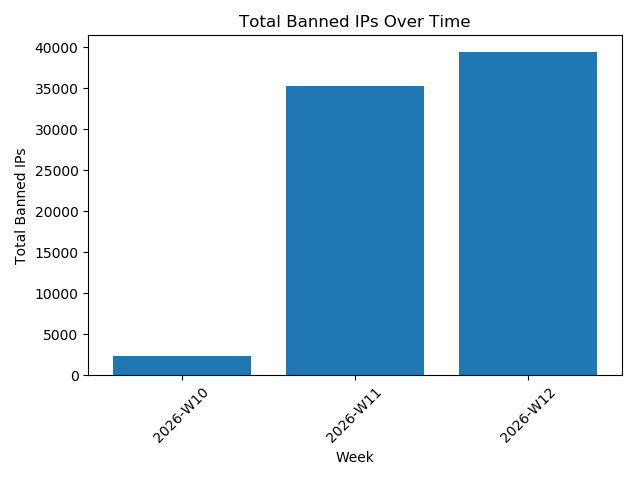 Banned IPs Trend Over Time Graph
How to Use banned_ips.txt?
The banned_ips.txt list can be directly integrated into your infrastructure firewall to block malicious IP addresses at the network level.
Below is an example using Fail2Ban.
Fail2Ban
1. Install Fail2Ban
Ubuntu / Debian:
1
2
sudo apt update
sudo apt install fail2ban -y
AlmaLinux / Rocky:
1
2
sudo dnf install epel-release -y
sudo dnf install fail2ban -y
2. Create a banned Jail (using Heredoc EOF)
1
2
3
4
5
6
7
8
sudo tee /etc/fail2ban/jail.d/banned-ips.conf > /dev/null << 'EOF'
[banned]
enabled = true
port    = all
filter  = sshd
banaction = iptables-allports
logpath = /var/log/secure
EOF
How It Works
- IPs added via
fail2ban-client set banned banip <IP>are included in ipset - Firewalld automatically blocks those IPs on all ports
No logs, filters, or ban time are required. IPs remain blocked until manually removed.
3. Enable and Start Fail2Ban
Enable Fail2Ban:
1
sudo systemctl enable --now fail2ban
Check Fail2Ban service status:
1
sudo systemctl status fail2ban
Other useful commands:
Check Fail2Ban and jails status:
1
sudo fail2ban-client status
Restart Fail2Ban service:
1
sudo systemctl restart fail2ban
4. Download Skillmio IP List and Apply Blocking
1
2
3
curl -s https://raw.githubusercontent.com/skillmio/CoSec/main/banned_ips.txt \
| grep -vE '^\s*#|^\s*$' \
| xargs -I{} sudo fail2ban-client set banned banip {}
This file contains the IPs to be automatically blocked.
5. Verify banned Jail Status
1
sudo fail2ban-client status banned
It should display the number of currently blocked IPs.
6. Automatically Update Blocked IPs (Optional but Recommended)
Create an update script:
1
2
3
4
5
6
7
sudo tee /usr/local/bin/update-skillmio-bannedip.sh > /dev/null << 'EOF'
#!/bin/bash

curl -s https://raw.githubusercontent.com/skillmio/CoSec/main/banned_ips.txt \
| grep -vE '^\s*#|^\s*$' \
| xargs -I{} sudo fail2ban-client set banned banip {}
EOF
Make the script executable:
1
sudo chmod +x /usr/local/bin/update-skillmio-bannedip.sh
Add a cron job:
1
sudo bash -c 'echo "0 * * * * /usr/local/bin/update-skillmio-bannedip.sh" >> /etc/crontab'
This checks for updates every hour.
After creating the script and making it executable, you can run it manually:
1
update-skillmio-bannedip.sh
Then verify the currently blocked IPs:
1
sudo fail2ban-client status banned
7. Summary
With this configuration:
- Fail2Ban is installed and protecting your server
- Skillmio’s blocked IP list actively blocks malicious IPs
- Automatic blacklist updates are enabled